


Ever stared at your reflection? Scissors in hand. Wondering if you could pull off a decent trim? Without shelling out cash for a barber visit? Yeah, me too. These days, with remote work and prices shooting up, more folks are rolling up sleeves for at-home haircuts. It’s not just about saving bucks. It’s that rush of nailing a fresh look right in your bathroom. If you’re diving into “how to cut your own hair,” this guide’s got your back. We’ll walk through it all. Clippers as the star. Keeping things straightforward. So even if you’ve never held one before, you’ll walk away feeling like you’ve got a pro’s touch. No fancy salon setup needed. Just some patience. And the right gear.
Let’s face it. Barbershops are great. But they’re not always practical. Traffic jams. Waiting rooms. Or just booking an appointment—it’s enough to make you hit snooze on grooming. Cutting your own hair flips that script. You control the vibe. The timing. And yeah, the cost. A study from the American Barber Association in 2023 pegged the average men’s haircut at around $25 a pop. Do that every four weeks? That’s over $300 a year. Ouch.
But here’s the real kicker. It’s empowering. Picture this lazy Saturday afternoon. Coffee brewing. Tunes on low. And you’re sculpting your fade just how you like it. No small talk with a stranger. No awkward “a little off the top” mix-ups. And for women tackling layers or bobs? Same deal. Precision on your terms. Of course, it’s not all smooth sailing. Botch it once. And you’ve got a lopsided mess staring back. That’s why starting simple with clippers makes sense. They’re forgiving for beginners. They buzz through bulk fast. Without the snip-snip drama of shears. Plus, in a world where self-reliance rules, mastering “how to cut your own hair” feels like a small win. One that sticks.
The numbers back it up too. The global haircutting at home market is set to grow from 3.2 billion USD in 2025 to 5.9 billion by 2033. That’s a steady climb at 7.5% per year. Folks are leaning into DIY more than ever. Why? Convenience plays a big part. And with one in five men feeling nervous about salon visits—yeah, haircut anxiety is real. Skipping that stress? Priceless. I remember my first go at it during lockdown. Buzz cut gone wrong. Hello, uneven patches. But it taught me more than any tutorial video. Fast forward. And now it’s routine. You in? Think about it. Low-maintenance styles like fades or crops are blowing up in 2025. They’re easy to maintain. And perfect for home tweaks.
Here’s why it clicks for so many:
Barbers might grumble about losing clients to DIY trends. But hey, it’s a win for us everyday guys and gals.
Before you fire up those clippers, let’s talk kit. You don’t need a full arsenal. Keep it lean. And mean. At the heart? A solid pair of cordless clippers. Go for ones with adjustable guards. Those plastic combs snap on for length control. From a zero gap for skin-close fades. Up to a half-inch or more for longer styles. Battery life matters too. Aim for at least 90 minutes runtime. So you’re not mid-cut with a dying tool.
Other must-haves:
On clippers specifically, look for stainless steel or titanium blades. They stay cool. And sharp. An LCD display? Game-changer for checking battery. Without squinting. And washable? Even better for quick cleanups. Weights around a pound keep your hand from cramping. During longer sessions.
Cordless ones shine here. They’re lighter. More portable. Perfect for twisting around without cords tripping you up. That mobility? It cuts hassle in half. Especially in tight bathroom spots.
| Tool | Why It Rocks | Pro Tip |
| Cordless Clippers | Freedom to move. No cord tangle | Pick 1200mAh battery for 2+ hours runtime |
| Guard Set (1/16″ to 1″) | Dial in exact lengths | Start with longer guards if you’re nervous |
| Neck Brush | Instant cleanup | Soft bristles beat stiff ones for sensitive skin |
| Handheld Mirror | See the back without yoga poses | Get one with a swivel. Trust me. It saves frustration |
Stocked up? Good. Now, onto the real work. One extra bit: oil your blades before starting. Keeps things smooth. And quiet.
Rushing in is a recipe for regret. Take five to set the stage. Clear your bathroom counter. No clutter means fewer slips. Lay down newspapers or a drop cloth. Those tiny hairs get everywhere. And vacuuming later sucks. Lighting’s key too. Harsh overhead bulbs highlight every nick. So add a ring light if your setup’s dim.
Hair prep is straightforward. But crucial. Wash it fresh. Towel-dry to damp. Why damp? Clippers glide smoother. Reducing pull. And that annoying static. If it’s curly or thick, detangle with a wide-tooth comb first. Pro move: section with clips. Part into top, sides, and back quadrants. This keeps things tidy. Like painting a room one wall at a time.
Oh, and mindset. Breathe. It’s hair. It grows back. I once psyched myself out over a simple trim. Ended up with a bowl cut vibe. Lesson learned: treat it like a chill project. Not open-heart surgery. For beginners, snap a “before” pic too. Helps track progress. And spot tweaks.
Alright, gloves off. Figuratively. We’ll break this into bitesize chunks. Starting simple. Assume a classic short fade for guys. Or a textured crop. Adapt as needed. For longer styles, blend in shears later. But clippers handle the bulk.
Start low. Snap on your shortest guard. Say, a #1 (1/8 inch). For the fade base. Stand sideways to the mirror. Clipper flat against your skin at the ear. Buzz upward in smooth, overlapping strokes. Like mowing a lawn. Stop at your fade line. Temple to earlobe, roughly. Repeat on the other side.
Now the back. Here’s where that handheld mirror shines. Tilt your head forward. Reach the clipper over your shoulder. Go slow. Vertical passes from neck up to the line. Overlap by half an inch each time. Feels awkward? Totally normal. If you’ve got a buddy, enlist ’em for a once-over. Aim for evenness. Eyeball it against your side.
Quick aside: on thick hair, go against the grain first. For closeness. Then with for blending. Data from grooming forums shows this cuts time by 20%. Without irritation.
For newbies, try this: hold the clipper like a pencil. Not a hammer. Looser grip means steadier lines. And arch it away as you go up. Prevents jagged edges.
Fades add that pro polish. Switch to a #2 guard. From your base line, arc upward an inch or so. Buzz lightly to blend. Feather the edges. Don’t press hard. Let the clipper do the work. Repeat levels: #3 for mid-fade. #4 for the top transition. Hold the tool at a 45-degree angle. For softer lines.
Women, this works for undercuts too. Buzz the nape low. Fade to longer layers on top. It’s versatile. My sister swears by it for her pixie. Says it frames her face. Without daily styling drama.
Extra tip: use fluid motions. Upward and out. Blends like butter. If your hair’s wavy, dampen sections again midway. Keeps it from springing funny.
Remove guards for the crown. Comb hair straight up. Then shear down with the bare blade. For a textured chop. Or keep a #4 on for uniform length. Work in rows. Front to back. For volume, point-cut: snip vertically into ends. At a slight angle. Clippers excel here. Faster than scissors for bulk removal.
Dry and style-check. Tousle with fingers. If it’s too choppy, even it with a longer guard pass. Boom. You’re done.
One more: brush forward first. Spots cowlicks early. Takes two seconds. Saves headaches.
Even pros slip up. Common pitfall: rushing the fade. It leads to harsh lines. Think stair-step instead of seamless. Solution? Practice on a mannequin head if you’re game. They’re cheap online.
Another: ignoring skin type. Dry blades irritate scalps. Especially if you’re prone to bumps. Lube ’em with clipper oil every 10 minutes. And vibration? Quiet models under 60dB keep neighbors clueless.
From years of watching guys fumble. Including myself. 70% of bad cuts stem from poor lighting. Fix that. And half your worries vanish.
But let’s list out the big ones to dodge:
One wild one? Cutting buzzed after a few drinks. Seen it end in disasters. Stay sober. Promise.
Don’t bail yet. Rinse clippings from your neck. Those itches later? No thanks. Disinfect the clipper: rinse under water if it’s washable. Air-dry blades. Store in a case to dodge dust.
For your hair, a light oil or pomade tames flyaways. Wait 24 hours before washing. Let cuticles settle. If irritation pops, slap on aloe. Nature’s balm.
And don’t forget the tools. Brush out hairs. Oil the blades. A drop or two keeps ’em humming next time. Pro barbers swear by it. For longevity.
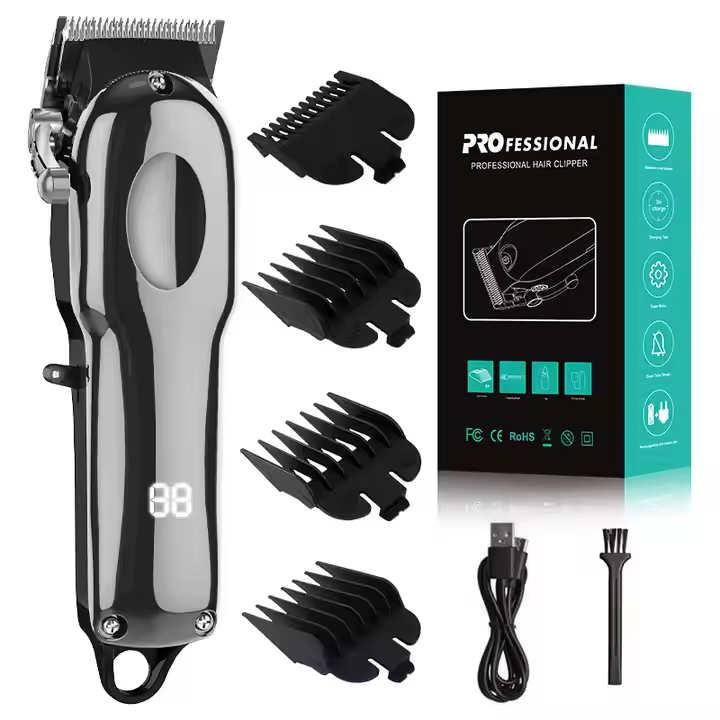
When you’re ready to invest in tools that last, check out SUOKE Electric. They’ve been crafting reliable home grooming gear for years. With a sharp eye on what everyday users need. As a go-to supplier, they blend OEM smarts with straightforward designs. Think cordless clippers that pack over 90 minutes of runtime. On a quick 1-3 hour charge. Stainless steel blades that resist heat. And LCD screens for at-a-glance battery checks. Their all-in-one sets come loaded with adjustable guards. And washable parts. Perfect for home setups without the fuss. Whether you’re fading sides or trimming the top, SUOKE’s lineup keeps things precise. And hassle-free. Built tough for repeated use. It’s that quiet reliability that turns a chore into a habit.
What sets them apart? Real-world perks like ergonomic grips. They fit natural hand curves. Reducing fatigue on longer jobs. And those batteries? USB charging means no hunting outlets mid-cut. Folks love the portability. Toss in a bag for travel trims. Or quick touch-ups at the gym. In a market booming to 2.5 billion by year’s end, SUOKE stands out for value. No frills. Just solid performance.
There you have it. A no-frills path to “how to cut your own hair.” That leaves you sharper. Steadier. And a tad prouder. Clippers make it accessible. Turning what could be intimidating into something downright doable. Next time you’re eyeing that overgrown mop, grab your gear. Give it a whirl. You might surprise yourself. And hey, if it doesn’t pan out perfectly? Laugh it off. Hair’s forgiving like that. With the DIY scene exploding—kits hitting 9.9 billion this year alone— you’re joining a crowd that’s smarter about grooming. Keep practicing. You’ll own it soon.
Start with longer guards to build confidence. And always keep the blade flat against your skin. Tilting causes slips. A quick spritz of water softens hair too. Cutting tug by half.
Go with a #2 or #3 guard (1/4 to 3/8 inch) for the first buzz. It’s forgiving on mistakes. Gives a clean look. Without going too short right off the bat.
Absolutely. Focus the fade steps on the underside for an undercut. Then texture the top with no-guard point-cutting. It’s a game-changer for low-maintenance bobs.
After every use. Especially if it’s washable. Rinse blades under lukewarm water. Pat dry. And oil the moving parts. Keeps ’em sharp. Your scalp happy.
Hands down, yes. With runtimes pushing 120 minutes, you get full mobility. No cords yanking you around mid-fade. Just charge via USB overnight. They’re lighter too. Ergonomic for steady hands. Perfect for home vibes.
